Welcome to all
Here is the link to download for portable google chrome web browser for usb edition
http://h1.ripway.com/zawminsoe/Portable_Google_Chrome_1.0.154.36.exe
Showing posts with label Browsers. Show all posts
Showing posts with label Browsers. Show all posts
December 21, 2008

November 14, 2008
Google Chrome Dual View
အေၾကာင္းအရာတူ ဆိုဒ္ႏွစ္ခုကို ႏိႈင္းယွဥ္ သံုးသပ္ရတဲ့ အခါမ်ား အေၾကာင္းအရာ တစ္ခုကို ကိုးကား ေျခရာျပန္ေကာက္ရတဲ့ အခါမ်ားမွာ Browser windows ႏွစ္ခု သို႔ Tab ႏွစ္ခု သံုးၿပီး ယွဥ္တြဲ ခဲ့ရတာပါ။ ၀င္းဒိုးႏွစ္ခုကို ခ်ံဳ႕ အရြယ္ေတာ္ညွိၿပီး ဘယ္ညာ ေနရာခ်ၿပီး ၾကည္႕ရမယ္ ဒါမွမဟုတ္ ဟိုတပ္ႏိွပ္ ဒီတပ္ႏိွပ္ ရနဲ႔ သိပ္မမိုက္လွ ပါဘူးဗ်ာ။
Chrome မွာေတာ့ plugin သံုးၿပီး Tab တစ္ခုထဲမွာဘဲ ယွဥ္တြဲ ၾကည္႕ႏိုင္သြားတယ္။ Screen resolution နိမ့္ေနရင္ေတာ့ ျပည္႕၀စြာျမင္ရဖို႕ ခဲယဥ္းပါမယ္။
 ရယူ သံုးစြဲ ရာမွာလည္း အခက္အခဲ မရွိပါဘူး။
ဒီ Chrome dual view plugin ကို toolbar ေပါ ္ drag n drop ဆြဲထည္႕ထားမယ္။
လိုအပ္ရင္ Chrome dual view ကိုႏွိပ္ၿပီး first popup မွာ လိပ္စာတစ္ခု second popup မွာ ယွဥ္တြဲမယ့္ လိပ္စာျဖည္႕ေပးလိုက္ရင္ ရပါၿပီ။
ဒါဆို ေသေသ သပ္သပ္ေလး ႏႈိင္းယွဥ္ၾကည္႕ႏိုင္ၿပီေပါ့....
Chrome မွာေတာ့ plugin သံုးၿပီး Tab တစ္ခုထဲမွာဘဲ ယွဥ္တြဲ ၾကည္႕ႏိုင္သြားတယ္။ Screen resolution နိမ့္ေနရင္ေတာ့ ျပည္႕၀စြာျမင္ရဖို႕ ခဲယဥ္းပါမယ္။

ဒီ Chrome dual view plugin ကို toolbar ေပါ ္ drag n drop ဆြဲထည္႕ထားမယ္။
လိုအပ္ရင္ Chrome dual view ကိုႏွိပ္ၿပီး first popup မွာ လိပ္စာတစ္ခု second popup မွာ ယွဥ္တြဲမယ့္ လိပ္စာျဖည္႕ေပးလိုက္ရင္ ရပါၿပီ။
ဒါဆို ေသေသ သပ္သပ္ေလး ႏႈိင္းယွဥ္ၾကည္႕ႏိုင္ၿပီေပါ့....
November 11, 2008
Useful Firefox as a calculater
ဂဏာန္းေပါင္းစက္လိုရင္ accessories ထဲမွာရွိတယ္လို႔ ေျပးျမင္ၾကပါမယ္။ Google site မွာလည္း “ answer to life, the universe, and everything ” ႐ိုက္လိုက္ရင္ ရတာဘဲ။ Vista widget ေတြနဲ႔ သီးသန္႔ ေဆာ့ဖ္၀ဲလ္ေတြဆို ေတာင္ပံုရာပံု ပါဘဲ။
ခု firefox browser သံုးရင္းလိုအပ္ရင္ တြက္ခ်က္ႏိုင္ေအာင္ပါ။ ဒါလည္း Firefox Calculator 1.1.12 addon ရွိသားဘဲ မဟုတ္လား...ဆိုၾကပါမယ္။
အဲဒါေတြ အားလံုးထက္ ပိုလြယ္တာေလးပါ။ Firefox မွာ အသင့္ပါလာတဲ့ Google search engine မွာ 1+1 ဆိုတာနဲ႔ =2 suggestion တန္းေပါ ္လာပါတယ္။ သတိမမူ မိေသးရင္ ႐ိုက္ၾကည္႕ပါဦး။ သခ်ာၤ သမား ဆိုရင္ေတာ့ functions ေတြ သံုးဖို႕ ဒီလင့္က အေထာက္အကူ ျဖစ္ေစပါလိမ့္မယ္။
ခု firefox browser သံုးရင္းလိုအပ္ရင္ တြက္ခ်က္ႏိုင္ေအာင္ပါ။ ဒါလည္း Firefox Calculator 1.1.12 addon ရွိသားဘဲ မဟုတ္လား...ဆိုၾကပါမယ္။
အဲဒါေတြ အားလံုးထက္ ပိုလြယ္တာေလးပါ။ Firefox မွာ အသင့္ပါလာတဲ့ Google search engine မွာ 1+1 ဆိုတာနဲ႔ =2 suggestion တန္းေပါ ္လာပါတယ္။ သတိမမူ မိေသးရင္ ႐ိုက္ၾကည္႕ပါဦး။ သခ်ာၤ သမား ဆိုရင္ေတာ့ functions ေတြ သံုးဖို႕ ဒီလင့္က အေထာက္အကူ ျဖစ္ေစပါလိမ့္မယ္။
September 14, 2008
Tweaks for Firefox 3
Firefox 3 ကို ပိုၿပီး အသံုးခ်လာႏိုင္ေစမယ့္ နည္းလမ္းေလးေတြ စုစည္းထားတာပါ။ About:config သံုးၿပီး ျမန္ႏႈန္းျမွင့္ျခင္း၊မန္မိုရီ ေလွ်ာ႔ခ်ျခင္း ေတြလို Firefox 3 ရဲ႕ တိမ္ျမဳတ္ေနတဲ့ စြမ္းအားေတြကို ေဖာ္ထုတ္ေပးႏိုင္ လာပါမယ္။ Hack for Firefox 3 မွာ ေရးၿပီးခဲ့သမွ် နဲ႔လည္း တြဲဖက္ ျပဳျပင္ႏိုင္ပါတယ္။
about:config ကို Url bar မွာ ႐ိုက္လိုက္ပါ။ သတိေပးခ်က္ ျပလာေတာ့ I`ll be careful I promise ေပါ့။ ေနာက္တစ္ႀကိမ္ မေတြ႕ရေအာင္ ျဖဳတ္ခဲ့လည္း ျဖစ္ပါတယ္။
1.Consumes less memory and CPU usage
 Filter bar မွာ browser.cache.memory.enable ကို႐ိုက္ၿပီး value ကို double click ျဖင့္ true သို႔ ေျပာင္းေပးပါ။
 ၿပီးလွ်င္ right click \new \integer ေရြးၿပီး popup windows မွာ browser.cache.memory.capacity ကို ျဖည္႔ေပးပါ။
 ထပ္မံၿပီး သူ႔တန္ဖိုးကို ျဖည္႕ေပးလိုက္ပါ။
ဥပမာ မိမိ RAM Memory က 256 MB ႏွစ္ေခ်ာင္း ရွိရင္ 8192 ကို ျဖည္႕ေပးရပါတယ္။ Start /control panel /system မွာ ၾကည္႕ႏိုင္ပါတယ္။
256 MB of RAM, enter “4096”
512 MB of RAM, enter “8192”
1 GB of RAM, enter “16384”
ဆက္တင္ အလုပ္လုပ္ဖို႕ restart လုပ္ေပး ရပါတယ္။ firetune addon သံုးထားရင္ မလိုပါဘူး။
2.Speed Tweaks
network.http.pipelining false to true
network.http.pipelining.maxrequests 30 to 8
network.http.max-connections 30 to 96
network.http.max-connections-per-server 15 to 32
network.http.max-persistent-connections-per-server 6 to 8
network.http.pipelining.ssl false to true
network.http.proxy.pipelining false to true
nglayout.initialpaint.delay 100 to 0
3.Auto Complete URL while You type at address Bar
browser.urlbar.autoFill=True
4.Disable Delay Time While Installing Firefox Add-on
security.dialog_enable_delay = 0
5.Disable Extension Compatibility Checks
extensions.checkCompatibility = False
extensions.checkUpdateSecurity = False
6.Stop Displaying Website Icon (Favicon) in Address bar & On Tab
browser.chrome.site_icons = False
7.Disable Prefetch
network.prefetch-next = False
Helpful for frequent Google searcher, low-speed internet connection or low RAM
8.Extend Spell check to forms
layout.spellcheckDefault = 2
Change Value from 1 to 2
9.Disable Blinking Text
browser.blink_allowed = False
10.Disable Annoying Browser Behavior
dom.disable_window_open_feature.menubar
dom.disable_window_move_resize
dom.disable_window_open_feature.titlebar
dom.disable_window_open_feature.toolbar
Set all of above to value False
11.Remove Tab Close Button from all Tab and set A single Close Button at Right
browser.tabs.closeButtons = 3
12.Disabler Browser Toolbar Tip
browser.chrome.toolbar_tips = False
13.Show More Tabs on Single Firefox Window before Scrolling
browser.tabs.tabMinWidth = 75
14.Past Copy Content with Middlemouse Click
middlemouse.paste = True
15.Scroll webpage in One Go
mousewheel.withaltkey.action=1
16.Increase History Undo Close Tab Limit ( Recently Closed Tabs )
browser.sessionstore.max_tabs_undo=15
By default you can undo 10 recently closed tabs inorder to increase your history closed tabs. Change number 13 to as per your choice.
17.Open Firefox Default Search Bar Result in New Tab
browser.search.openintab=True
18.Right Click View Source in Your Favorite Editor
view_source.editor.external=True
view_source.editor.path= Path of Editor
(e.g. path C:\Program Files\npp.4.8.2.bin\notepad++.exe)
19.Enable/Disable Single Click to Select Whole URL in Address bar
browser.urlbar.clickSelectsAll = True ( for enable )
browser.urlbar.clickSelectsAll = False ( for disable )
20.Fast Scrolling Across Tabs
toolkit.scrollbox.scrollIncrement =75
75 is number of pixels to scroll at a time when scrolling the tab strip’s scrollbox. (Default: 20)
စမ္းသပ္ရင္း မွားႏိုင္တယ္၊မႀကိဳက္လို. ျပန္ဖ်က္ႏိုင္ေအာင္ backup ႀကိဳလုပ္ထားလိုက္ပါ။
about:config ကို Url bar မွာ ႐ိုက္လိုက္ပါ။ သတိေပးခ်က္ ျပလာေတာ့ I`ll be careful I promise ေပါ့။ ေနာက္တစ္ႀကိမ္ မေတြ႕ရေအာင္ ျဖဳတ္ခဲ့လည္း ျဖစ္ပါတယ္။
1.Consumes less memory and CPU usage


ဥပမာ မိမိ RAM Memory က 256 MB ႏွစ္ေခ်ာင္း ရွိရင္ 8192 ကို ျဖည္႕ေပးရပါတယ္။ Start /control panel /system မွာ ၾကည္႕ႏိုင္ပါတယ္။
256 MB of RAM, enter “4096”
512 MB of RAM, enter “8192”
1 GB of RAM, enter “16384”
ဆက္တင္ အလုပ္လုပ္ဖို႕ restart လုပ္ေပး ရပါတယ္။ firetune addon သံုးထားရင္ မလိုပါဘူး။
2.Speed Tweaks
network.http.pipelining false to true
network.http.pipelining.maxrequests 30 to 8
network.http.max-connections 30 to 96
network.http.max-connections-per-server 15 to 32
network.http.max-persistent-connections-per-server 6 to 8
network.http.pipelining.ssl false to true
network.http.proxy.pipelining false to true
nglayout.initialpaint.delay 100 to 0
3.Auto Complete URL while You type at address Bar
browser.urlbar.autoFill=True
4.Disable Delay Time While Installing Firefox Add-on
security.dialog_enable_delay = 0
5.Disable Extension Compatibility Checks
extensions.checkCompatibility = False
extensions.checkUpdateSecurity = False
6.Stop Displaying Website Icon (Favicon) in Address bar & On Tab
browser.chrome.site_icons = False
7.Disable Prefetch
network.prefetch-next = False
Helpful for frequent Google searcher, low-speed internet connection or low RAM
8.Extend Spell check to forms
layout.spellcheckDefault = 2
Change Value from 1 to 2
9.Disable Blinking Text
browser.blink_allowed = False
10.Disable Annoying Browser Behavior
dom.disable_window_open_feature.menubar
dom.disable_window_move_resize
dom.disable_window_open_feature.titlebar
dom.disable_window_open_feature.toolbar
Set all of above to value False
11.Remove Tab Close Button from all Tab and set A single Close Button at Right
browser.tabs.closeButtons = 3
12.Disabler Browser Toolbar Tip
browser.chrome.toolbar_tips = False
13.Show More Tabs on Single Firefox Window before Scrolling
browser.tabs.tabMinWidth = 75
14.Past Copy Content with Middlemouse Click
middlemouse.paste = True
15.Scroll webpage in One Go
mousewheel.withaltkey.action=1
16.Increase History Undo Close Tab Limit ( Recently Closed Tabs )
browser.sessionstore.max_tabs_undo=15
By default you can undo 10 recently closed tabs inorder to increase your history closed tabs. Change number 13 to as per your choice.
17.Open Firefox Default Search Bar Result in New Tab
browser.search.openintab=True
18.Right Click View Source in Your Favorite Editor
view_source.editor.external=True
view_source.editor.path= Path of Editor
(e.g. path C:\Program Files\npp.4.8.2.bin\notepad++.exe)
19.Enable/Disable Single Click to Select Whole URL in Address bar
browser.urlbar.clickSelectsAll = True ( for enable )
browser.urlbar.clickSelectsAll = False ( for disable )
20.Fast Scrolling Across Tabs
toolkit.scrollbox.scrollIncrement =75
75 is number of pixels to scroll at a time when scrolling the tab strip’s scrollbox. (Default: 20)
စမ္းသပ္ရင္း မွားႏိုင္တယ္၊မႀကိဳက္လို. ျပန္ဖ်က္ႏိုင္ေအာင္ backup ႀကိဳလုပ္ထားလိုက္ပါ။
September 11, 2008
Useful tricks non add-ons in Firefox
Gtalk,Gmail နဲ႔ Cbox ေတြ ကို add-ons မသံုးဘဲ firefox မွာေပါင္းထည္႕ထားၾကရေအာင္။ ကိုယ္ပိုင္ Cbox မဟုတ္လည္း တျခား Cbox မွာ ေမးထား ေျပာထားတာေတြ ေစာင့္ၾကည္႕ဖို႔ သံုးႏိုင္တာေပါ့။

လြယ္ပါတယ္..Gtalk အတြက္ http://talkgadget.google.com/talkgadget/popout မွာ login ၀င္ၿပီး Url bar က star ေလးႏိွပ္ bookmark toolbar ေပါ ္ မွတ္ထားလိုက္ေပါ့။

Bookmark toolbar ေပါ ္က Gtalk icon ေပါ ္ right click \properties သြားၿပီး load this bookmark in the sidebar ကို အမွန္ျခစ္ေလး ေပးခဲ့ရင္ ရပါၿပီ။ Firefox မွာ ၀န္မပိေစဘဲ အိုင္ကြန္ေလးႏိွပ္ၿပီး ခ်တ္ႏိုင္ပါၿပီ။
Cbox အတြက္ကေတာ့ Cbox link တစ္ခုမွာ rightclick \this frame \bookmark this frame ေရြးၿပီး Gtalk အတိုင္း load this bookmark in the sidebar ကို အမွန္ျခစ္ ေပးလိုက္႐ံုေပါ့။
Gmail ကို https://mail.google.com/mail/feed/atom လင့္ကေန login ၀င္ၿပီး bookmark toolbar မွာေပါင္းထည္႕ေပးလိုက္ပါ။ ဒါဆို စာအ၀င္ သိႏိုင္ပါၿပီ။
အားလံုးကို logout မလုပ္ဘဲ master password ခံသံုးရင္ ပိုအဆင္ေျပတာေပါ့။ Tools \options \security \change master password မွာ ႏွစ္သက္ရာ password ထည္႕ေပးလိုက္တာေပါ့။ အသံုး၀င္ လိမ့္မယ္လို႔ ေမွ်ာ္လင့္ ပါတယ္။
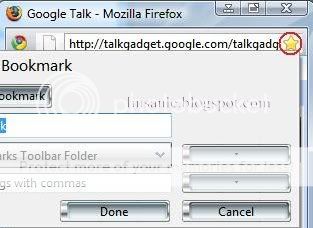
လြယ္ပါတယ္..Gtalk အတြက္ http://talkgadget.google.com/talkgadget/popout မွာ login ၀င္ၿပီး Url bar က star ေလးႏိွပ္ bookmark toolbar ေပါ ္ မွတ္ထားလိုက္ေပါ့။

Bookmark toolbar ေပါ ္က Gtalk icon ေပါ ္ right click \properties သြားၿပီး load this bookmark in the sidebar ကို အမွန္ျခစ္ေလး ေပးခဲ့ရင္ ရပါၿပီ။ Firefox မွာ ၀န္မပိေစဘဲ အိုင္ကြန္ေလးႏိွပ္ၿပီး ခ်တ္ႏိုင္ပါၿပီ။
Cbox အတြက္ကေတာ့ Cbox link တစ္ခုမွာ rightclick \this frame \bookmark this frame ေရြးၿပီး Gtalk အတိုင္း load this bookmark in the sidebar ကို အမွန္ျခစ္ ေပးလိုက္႐ံုေပါ့။
Gmail ကို https://mail.google.com/mail/feed/atom လင့္ကေန login ၀င္ၿပီး bookmark toolbar မွာေပါင္းထည္႕ေပးလိုက္ပါ။ ဒါဆို စာအ၀င္ သိႏိုင္ပါၿပီ။
အားလံုးကို logout မလုပ္ဘဲ master password ခံသံုးရင္ ပိုအဆင္ေျပတာေပါ့။ Tools \options \security \change master password မွာ ႏွစ္သက္ရာ password ထည္႕ေပးလိုက္တာေပါ့။ အသံုး၀င္ လိမ့္မယ္လို႔ ေမွ်ာ္လင့္ ပါတယ္။
Useful of Foxyproxy and IE7pro
Foxyproxy နဲ႔ IE7pro ကို အသံုးျပဳၿပီး browser ေတြမွာ proxy ေတြ ေျပာင္းႏိုင္ ပါတယ္။ ဒီႏွစ္ခုက plugin နဲ႔ addon ကြာျခားေနေပမယ့္ proxy ေတြ ေျပာင္းလည္းရာမွာ foxyproxy က firefox အတြက္ IEpro က IE အတြက္ သံုးစြဲပါမယ္။ tool \options \proxy setting မွာ server no. ေတြ သြားေျပာင္းေပးေနရတဲ့ အခ်ိန္ကုန္ အလုပ္႐ႈတ္ သက္သာေစတဲ့ freeware ေတြပါ။
အခက္အခဲေတြကို ေက်ာ္လႊားဖို႔ Ultrasurf, Freedom, Freegate software ေတြ ရယူအသံုးျပဳေနသူ ျဖစ္ရပါမယ္။ အျခား proxy software ေတြ ရွိေသးေပမယ့္ ဒီ ေဆာ့ဖ္၀ဲလ္ေတြေလာက္ အခမဲ့ အဆင္ေျပေျပ သံုးမရပါဘူး။
တစ္ျခား ခုန္ပ်ံ ေက်ာ္လႊား နည္းတစ္ခ်ိဳ႕ေတာ့ ဒီမွာ နဲ႔ ဒီမွာ ေရးခဲ့ဘူးပါတယ္။
ပထမဆံုး အထက္က proxy software(Ultrasurf) တစ္ခု ရယူၿပီး ဖြင့္ထားလိုက္ပါ။
Foxy proxy for Firefox
Firefox မွာ Foxyproxy ကို download&install ၿပီးရင္ restart လုပ္လိုက္ပါ။ Tor proxy ကိုေတာ့ မသံုးဘူးဗ်ာ။ ေက်ာ္ခဲ့လိုက္ေပါ့။
Firefox statusbar မွာ foxyproxy ေလးေရာက္ေနၿပီဆိုရင္ right click နဲ႔ options ကိုေရြးလိုက္ပါ။

Add new proxy ကို ႏိွပ္ၿပီး General tab မွာ Ultrasurf နဲ႔ proxy details tab ရဲ႕ manual proxy configuration မွာ host name 127.0.0.1 port 9666 ကို ျဖည္႕ေပးပါ။ Freedom က 127.0.0.1:8080 ျဖစ္ၿပီး Freegate က 127.0.0.1:8567 ျဖစ္ပါတယ္။
Pattern tab မွာ Add new pattern ကို ႏိွပ္ၿပီး Pattern name=sanle URl pattern=linsanle.blogspot.com ျဖည္႕ေပးရင္ ရပါၿပီ :)။ဒါဆို status bar က foxyproxy ကို ညာကလစ္ ႏိွပ္ၿပီး Ultrasurf ကို ေရြးရင္ ေက်ာ္ခြ ထြက္ခြါ ႏိုင္ပါၿပီ။
Froxyproxy ရဲ႕ အားသာခ်က္ တစ္ခုက block page ေတြကို auto ေျပာင္းဖြင့္ေပးႏိုင္ပါတယ္။ Setting ေတာ့ ခ်ိန္ထားေပးရပါတယ္။
Foxyproxy ရဲ႕ options ကို သြားၿပီး Mode မွာ Use proxies based on their pre-defined patterns and priorities ကို ေရြးေပးပါ။ ဆက္ၿပီး auto add မွာ enable ကို အမွန္ျခစ္ေလး ေပးလိုက္ပါ။

Proxy to which patterns are automatically added မွာ Ultrasurf ေရြးေပးေပါ့။
Pattern to identify blocked websites ရဲ႕ Define tab ကိုႏွိပ္ၿပီး *The access to requested URL has been denied* သို႔ *This site is blocked by MPT* သက္ဆိုင္ရာတစ္ခုကို ေျပာင္းထည္႕ေပးလိုက္ပါ။ ဒါဆို ရပါၿပီ။
Blocked site တစ္ခုနဲ႔ IP viewer site တစ္ခုတို႔ ယွဥ္တြဲ ဖြင့္လိုက္ရင္ proxy ႏွစ္ခုနဲ႔ သြားေနတာ ေတြ႕ႏိုင္ပါမယ္။
IE7pro for internet explorer
IE7pro ကို download&install လုပ္ေပးပါ။

ၿပီးလွ်င္ IE status bar မွာ IEpro icon ေပါ ္ rightclick \proxy setting \edit proxy list ကိုသြားၿပီး 127.0.0.1:9666 ကို ေပါင္းထည္႕ေပးလိုက္ပါ။

ဒါဆို ေနာင္ ေက်ာ္ခြဖို႔ လိုအပ္ရင္ IEpro icon ေပါ ္ rightclick \proxy setting \127.0.0.1:9666 ကို ေရြးတာေပါ့။ မလိုေတာ့ Disable proxy ေပါ့ဗ်ာ။
ကၽြန္ေတာ္ ဒီနည္းေတြနဲ႔ rapidshare မွာ ဟိုေျပး ဒီေျပး လုပ္ေလ့ရွိတယ္။ IE7pro က Enhance Internet Explorer's Tabbed Browsing Capabilities, Super Drag and Drop, Mouse Gesture, Crash Recovery, Save Page to Image, AD Blocker, Greasy monkey alike User Script, Inline Search, Spell Check လုပ္ငန္းေတြကိုပါ စြမ္းေဆာင္ ေပးပါတယ္။ သူ႔ကိုသံုးထားရင္ IE လည္း ပိုၿမိဳင္သြားတာေပါ့။
ေနာက္တစ္ခုက Avant browser ပါ။ သူ႔ကိုသံုးရင္ proxy setting ပါၿပီးသားမို႔ 127.0.0.1:9666 ကို tools \proxy \customize မွာ သြားထည္႕ေပးလိုက္႐ံုပါဘဲ။ ျမန္ေပမယ့္ ကြန္နက္ရွင္ က်ဆင္းေနရင္ အု..အား..ျပားခ်ပ္ခ်ပ္..ျဖစ္သြားတတ္လို႔ ျမန္မာ့ေရေျမ ကို မႀကိဳက္ပါဘူး။
ဒီအေၾကာင္းေတြကို ေတာ္ေတာ္ မ်ားမ်ား ေရးခဲ့ၾက ၿပီးပါၿပီ။ လက္ရွိ သံုးေနသူေတြ မွတ္သားဖူးသူေတြက မလိုအပ္ ေတာ့ေပမယ့္ ေမးျမန္း သိလိုသူေတြ ရွိဆဲပါ။ အေျခအေန အရလည္း လိုအပ္ခ်က္ ႀကီးမားလာတာကိုး။ ဒါေၾကာင့္ လက္လွမ္းမွီရာ မည္သည္႕ေနရာမဆို ရရွိႏိုင္ၿပီး အဆင္ေျပေျပ သံုးစြဲႏိုင္ေစဖို႔ ေ၀ငွ လိုက္ပါတယ္။ ဒီနည္းေတြနဲ႔ အခ်ိန္ပိုေတြ တိုးပြားဖို႔ အႀကိဳးျပဳႏိုင္ေကာင္းပါရဲ႕။
အခက္အခဲေတြကို ေက်ာ္လႊားဖို႔ Ultrasurf, Freedom, Freegate software ေတြ ရယူအသံုးျပဳေနသူ ျဖစ္ရပါမယ္။ အျခား proxy software ေတြ ရွိေသးေပမယ့္ ဒီ ေဆာ့ဖ္၀ဲလ္ေတြေလာက္ အခမဲ့ အဆင္ေျပေျပ သံုးမရပါဘူး။
တစ္ျခား ခုန္ပ်ံ ေက်ာ္လႊား နည္းတစ္ခ်ိဳ႕ေတာ့ ဒီမွာ နဲ႔ ဒီမွာ ေရးခဲ့ဘူးပါတယ္။
ပထမဆံုး အထက္က proxy software(Ultrasurf) တစ္ခု ရယူၿပီး ဖြင့္ထားလိုက္ပါ။
Foxy proxy for Firefox
Firefox မွာ Foxyproxy ကို download&install ၿပီးရင္ restart လုပ္လိုက္ပါ။ Tor proxy ကိုေတာ့ မသံုးဘူးဗ်ာ။ ေက်ာ္ခဲ့လိုက္ေပါ့။
Firefox statusbar မွာ foxyproxy ေလးေရာက္ေနၿပီဆိုရင္ right click နဲ႔ options ကိုေရြးလိုက္ပါ။

Add new proxy ကို ႏိွပ္ၿပီး General tab မွာ Ultrasurf နဲ႔ proxy details tab ရဲ႕ manual proxy configuration မွာ host name 127.0.0.1 port 9666 ကို ျဖည္႕ေပးပါ။ Freedom က 127.0.0.1:8080 ျဖစ္ၿပီး Freegate က 127.0.0.1:8567 ျဖစ္ပါတယ္။
Pattern tab မွာ Add new pattern ကို ႏိွပ္ၿပီး Pattern name=sanle URl pattern=linsanle.blogspot.com ျဖည္႕ေပးရင္ ရပါၿပီ :)။ဒါဆို status bar က foxyproxy ကို ညာကလစ္ ႏိွပ္ၿပီး Ultrasurf ကို ေရြးရင္ ေက်ာ္ခြ ထြက္ခြါ ႏိုင္ပါၿပီ။
Froxyproxy ရဲ႕ အားသာခ်က္ တစ္ခုက block page ေတြကို auto ေျပာင္းဖြင့္ေပးႏိုင္ပါတယ္။ Setting ေတာ့ ခ်ိန္ထားေပးရပါတယ္။
Foxyproxy ရဲ႕ options ကို သြားၿပီး Mode မွာ Use proxies based on their pre-defined patterns and priorities ကို ေရြးေပးပါ။ ဆက္ၿပီး auto add မွာ enable ကို အမွန္ျခစ္ေလး ေပးလိုက္ပါ။
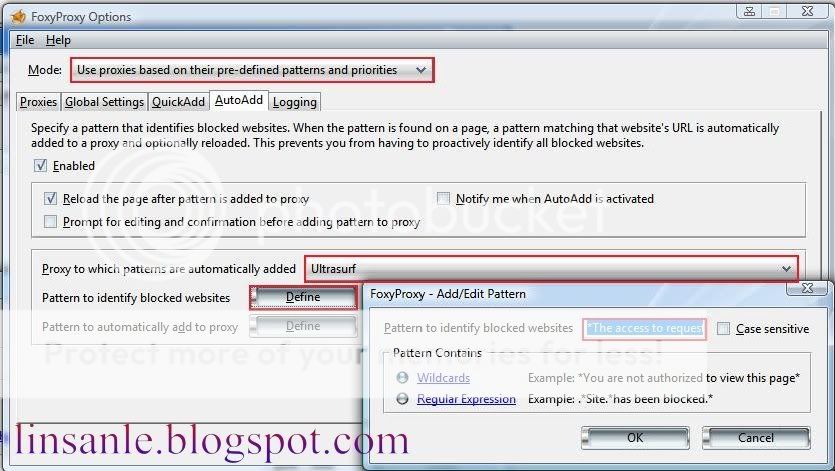
Proxy to which patterns are automatically added မွာ Ultrasurf ေရြးေပးေပါ့။
Pattern to identify blocked websites ရဲ႕ Define tab ကိုႏွိပ္ၿပီး *The access to requested URL has been denied* သို႔ *This site is blocked by MPT* သက္ဆိုင္ရာတစ္ခုကို ေျပာင္းထည္႕ေပးလိုက္ပါ။ ဒါဆို ရပါၿပီ။
Blocked site တစ္ခုနဲ႔ IP viewer site တစ္ခုတို႔ ယွဥ္တြဲ ဖြင့္လိုက္ရင္ proxy ႏွစ္ခုနဲ႔ သြားေနတာ ေတြ႕ႏိုင္ပါမယ္။
IE7pro for internet explorer
IE7pro ကို download&install လုပ္ေပးပါ။

ၿပီးလွ်င္ IE status bar မွာ IEpro icon ေပါ ္ rightclick \proxy setting \edit proxy list ကိုသြားၿပီး 127.0.0.1:9666 ကို ေပါင္းထည္႕ေပးလိုက္ပါ။
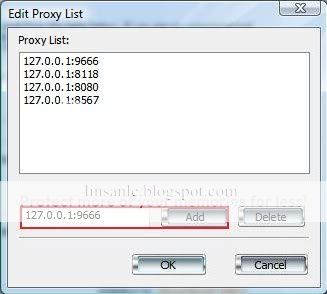
ဒါဆို ေနာင္ ေက်ာ္ခြဖို႔ လိုအပ္ရင္ IEpro icon ေပါ ္ rightclick \proxy setting \127.0.0.1:9666 ကို ေရြးတာေပါ့။ မလိုေတာ့ Disable proxy ေပါ့ဗ်ာ။
ကၽြန္ေတာ္ ဒီနည္းေတြနဲ႔ rapidshare မွာ ဟိုေျပး ဒီေျပး လုပ္ေလ့ရွိတယ္။ IE7pro က Enhance Internet Explorer's Tabbed Browsing Capabilities, Super Drag and Drop, Mouse Gesture, Crash Recovery, Save Page to Image, AD Blocker, Greasy monkey alike User Script, Inline Search, Spell Check လုပ္ငန္းေတြကိုပါ စြမ္းေဆာင္ ေပးပါတယ္။ သူ႔ကိုသံုးထားရင္ IE လည္း ပိုၿမိဳင္သြားတာေပါ့။
ေနာက္တစ္ခုက Avant browser ပါ။ သူ႔ကိုသံုးရင္ proxy setting ပါၿပီးသားမို႔ 127.0.0.1:9666 ကို tools \proxy \customize မွာ သြားထည္႕ေပးလိုက္႐ံုပါဘဲ။ ျမန္ေပမယ့္ ကြန္နက္ရွင္ က်ဆင္းေနရင္ အု..အား..ျပားခ်ပ္ခ်ပ္..ျဖစ္သြားတတ္လို႔ ျမန္မာ့ေရေျမ ကို မႀကိဳက္ပါဘူး။
ဒီအေၾကာင္းေတြကို ေတာ္ေတာ္ မ်ားမ်ား ေရးခဲ့ၾက ၿပီးပါၿပီ။ လက္ရွိ သံုးေနသူေတြ မွတ္သားဖူးသူေတြက မလိုအပ္ ေတာ့ေပမယ့္ ေမးျမန္း သိလိုသူေတြ ရွိဆဲပါ။ အေျခအေန အရလည္း လိုအပ္ခ်က္ ႀကီးမားလာတာကိုး။ ဒါေၾကာင့္ လက္လွမ္းမွီရာ မည္သည္႕ေနရာမဆို ရရွိႏိုင္ၿပီး အဆင္ေျပေျပ သံုးစြဲႏိုင္ေစဖို႔ ေ၀ငွ လိုက္ပါတယ္။ ဒီနည္းေတြနဲ႔ အခ်ိန္ပိုေတြ တိုးပြားဖို႔ အႀကိဳးျပဳႏိုင္ေကာင္းပါရဲ႕။
September 8, 2008
Google Chrome Add-Ons for Firefox
Firefox မွာ Google Chrome addons ေပါင္းထည္႕ထားလို႔ရပါတယ္။ Firefox သံုးရင္း လင့္ေတြကို အလြယ္တကူ chrome နဲ႔ ေျပာင္းဖြင့္ သြားႏိုင္ပါတယ္။ တြဲသံုးဖို႔ ေဒါင္းလုဒ္ မလုပ္ရေသးရင္ google chrome portable သို႔ မူရင္းဆိုဒ္ က ယူထားႏိုင္ပါတယ္။
GC (google chrome) က မျပည္႕စံုေသးေတာ့ FF(firefox) ဘဲ သံုးေနရတာေပါ့။ FF ကို proxy နဲ႔ သံုးရင္း မေက်ာ္ မခြရတဲ့ လင့္ေတြကို rightclick ေလးနဲ႔ GC ကဖြင့္သြားရင္ ေတာ္ေတာ္ အလုပ္႐ႈတ္ သက္သာသြားတယ္။

Open-in-google-chrome.xpi ကို ေဒါင္းလုဒ္ လုပ္ၿပီး FF မွာ ဖြင့္လိုက္ပါ။ ဒါဆို addon install လုပ္သြားပါမယ္။
FF restart လုပ္ၿပီး tools \addons \open in google chrome \options ကို အဆင့္ဆင့္ သြားလိုက္ပါ။

Google Chrome Options Windows မွာ C:\Documents and Settings\Administrator\Local Settings\Application Data\Google\Chrome\Application\chrome.exe (for xp) or C:\Users\Administrator\AppData\Local\Google\Chrome\Application\chrome.exe (for vista) ကို copy/paste ျဖည္႕ၿပီး ရင္ ရပါၿပီ။ Administrator ေနရာ မိမိ အေကာင့္ ေျပာင္းေပးလိုက္ပါ။ Manual Browse လုပ္ရင္ေတာ့ show hidden files and folders ကို folder options မွာ ေ႐ြးထားေပးပါ။ Folder options က ဗိုင္းရပ္စ္ ႏိွပ္စက္လို႔ လူတိုင္းေလာက္ သိမွာပါ :-)
 Navigation toolbar က home bottom ေဘးမွာ ခုလို ေပါ ္ေနေအာင္ toolbar \rightclick \customize သြားၿပီး drag n drop ဆြဲထည္႕ထားလို႔ ရပါတယ္။
GC (google chrome) က မျပည္႕စံုေသးေတာ့ FF(firefox) ဘဲ သံုးေနရတာေပါ့။ FF ကို proxy နဲ႔ သံုးရင္း မေက်ာ္ မခြရတဲ့ လင့္ေတြကို rightclick ေလးနဲ႔ GC ကဖြင့္သြားရင္ ေတာ္ေတာ္ အလုပ္႐ႈတ္ သက္သာသြားတယ္။

Open-in-google-chrome.xpi ကို ေဒါင္းလုဒ္ လုပ္ၿပီး FF မွာ ဖြင့္လိုက္ပါ။ ဒါဆို addon install လုပ္သြားပါမယ္။
FF restart လုပ္ၿပီး tools \addons \open in google chrome \options ကို အဆင့္ဆင့္ သြားလိုက္ပါ။
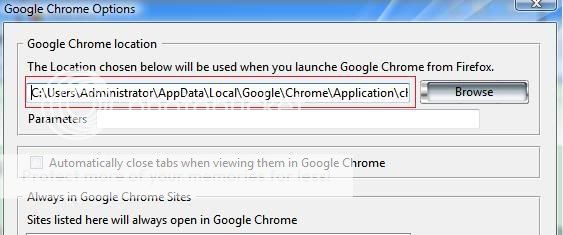
Google Chrome Options Windows မွာ C:\Documents and Settings\Administrator\Local Settings\Application Data\Google\Chrome\Application\chrome.exe (for xp) or C:\Users\Administrator\AppData\Local\Google\Chrome\Application\chrome.exe (for vista) ကို copy/paste ျဖည္႕ၿပီး ရင္ ရပါၿပီ။ Administrator ေနရာ မိမိ အေကာင့္ ေျပာင္းေပးလိုက္ပါ။ Manual Browse လုပ္ရင္ေတာ့ show hidden files and folders ကို folder options မွာ ေ႐ြးထားေပးပါ။ Folder options က ဗိုင္းရပ္စ္ ႏိွပ္စက္လို႔ လူတိုင္းေလာက္ သိမွာပါ :-)
 Navigation toolbar က home bottom ေဘးမွာ ခုလို ေပါ ္ေနေအာင္ toolbar \rightclick \customize သြားၿပီး drag n drop ဆြဲထည္႕ထားလို႔ ရပါတယ္။
 September 7, 2008
Google Chrome Add-ons
Firefox user ေတြ Google Chrome Browser (GC) ကို သံုးၾကည္႕ၿပီး အလိုအပ္ဆံုးက addons ျဖစ္ေနပါတယ္။ Toolsbar မပါ addon မရွိလို႔ အခက္ေတြ႕ေနရင္ ဒီက ယူသံုးလိုက္ေပါ့ဗ်ာ။ လြယ္သလား မေမးနဲ႔ GC bookmarks bar ေပါ ္ drag and drop ဆြဲထည္႕လိုက္ပါ။ သံုးေနက် ေတြမို႔ ရွင္းျပေနဖို႔ မလိုေတာ့ပါဘူးေနာ႕.........
1.Adblock+
2.Stumble it
3.Socialize
4.Google Pagerank
5.Video downloader
6.Twitter now
7.Tumblelog
8.Dictionary
9.Translate
10. Reference
11.Gmail This
12.Google Apps Mail
13.Linkify
14.Thesaurus
Google Chrome Add-ons
1.Adblock+
2.Stumble it
3.Socialize
4.Google Pagerank
5.Video downloader
6.Twitter now
7.Tumblelog
8.Dictionary
9.Translate
10. Reference
11.Gmail This
12.Google Apps Mail
13.Linkify
14.Thesaurus
September 6, 2008
Disable virus scan for firefox 3
Firefox 3 ရဲ႕ သြင္ျပင္သစ္ တစ္ခုက ေဒါင္းလုဒ္ ၿပီးသြားရင္ ဗိုင္းရပ္စ္ စစ္ေပးပါတယ္။ ကိုယ့္မွာ အန္တီဗိုင္းရပ္စ္ ပ႐ိုဂရမ္ ေကာင္းေကာင္းရွိရင္ ဒီအဆင့္ကို ျဖဳတ္ထားႏိုင္ပါတယ္။ စကၠန္႔ ပိုင္းေလာက္သာ ဆိုေပမယ့္ မလိုအပ္ဘဲ အႀကိမ္မ်ားစြာ မေစာင့္ရေအာင္ ျဖဳတ္ထားလည္း ျပသနာ မရွိပါဘူး။
Firefox ရဲ႕ address bar မွာ about:config ကို႐ိုက္ပါ။ သတိေပးခ်က္ ေပါ ္လာရင္ ဆက္ႏွိပ္တာေပါ့။
Filter bar မွာ " scanWhenDone " ကို႐ိုက္ၿပီး " browser.download.manager.scanWhenDone " ကိုရွာလိုက္ပါမယ္။

Preference Name မွ " browser.download.manager.scanWhenDone " ရဲ႕ value ကို double click ျဖင့္ false သို႔ ေျပာင္းေပးျခင္းျဖင့္ auto scan ကို ဖယ္ထုတ္ႏိုင္ပါတယ္။ Restart ျပန္လုပ္စရာ မလိုဘဲ ေဒါင္းလုဒ္ ၿပီးသြားတိုင္း scan လုပ္ျခင္းအဆင့္ ေပ်ာက္ကြယ္ ေနပါလိမ့္မယ္။
Firefox ရဲ႕ address bar မွာ about:config ကို႐ိုက္ပါ။ သတိေပးခ်က္ ေပါ ္လာရင္ ဆက္ႏွိပ္တာေပါ့။
Filter bar မွာ " scanWhenDone " ကို႐ိုက္ၿပီး " browser.download.manager.scanWhenDone " ကိုရွာလိုက္ပါမယ္။
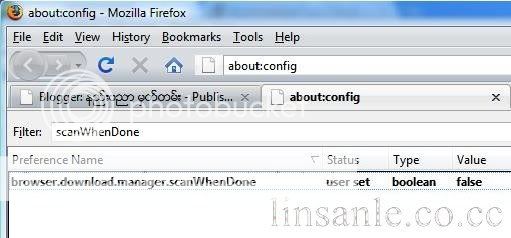
Preference Name မွ " browser.download.manager.scanWhenDone " ရဲ႕ value ကို double click ျဖင့္ false သို႔ ေျပာင္းေပးျခင္းျဖင့္ auto scan ကို ဖယ္ထုတ္ႏိုင္ပါတယ္။ Restart ျပန္လုပ္စရာ မလိုဘဲ ေဒါင္းလုဒ္ ၿပီးသြားတိုင္း scan လုပ္ျခင္းအဆင့္ ေပ်ာက္ကြယ္ ေနပါလိမ့္မယ္။
September 3, 2008
Google Chrome
Google က ဘေရာက္ဆာသစ္ ထြက္လာလို႔ စမ္းသံုးၾကည္႕မိတယ္။ Beta version ေပမယ့္ အေတာ္ေလး လန္းတယ္။ XP/VISTA support ျဖစ္ၿပီး ပါးလႊာ ႐ွင္းလင္းေနတယ္လို႔ ျမင္မိတယ္။ Opensource အျဖစ္ ေပးထားၿပီး feature ေတြကလည္း သံုးၾကည္႕သေလာက္ ႏွစ္သက္မိတယ္။
 Opera ရဲ႕ speeddial လိုမ်ိဳး ctrl+t နဲ႔ ေခါ ္လိုက္ရင္ recent boomarks ေလးကိုျမင္ရပါတယ္။ Tabs ကိုလည္း drag n drop အလြယ္ ေရႊ႕ေျပာင္းႏိုင္တယ္။
Mail ကိုဖြင့္ create application shortcuts နဲ႔ desktop ကို ေရြးေပးလိုက္ရင္ ေနာင္ ေမးလ္ကို web apps တစ္ခုလို ကလစ္ေလးနဲ႔ အလြယ္သံုးႏိုင္သြားပါတယ္။
 search box ကို သီးသန္႔မဟုတ္ဘဲ url bar မွာ တြဲထားၿပီး ယၡင္ သံုးခဲ့တဲ့လိပ္စာ နဲ႔ ရွာေဖြေရးအင္ဂ်င္ တစ္ေနရာတည္း ေရြးခ်ယ္ရပါတယ္။ Search enging ေျပာင္းဘို႔ ေတာ့ option သြားခိုင္းထားတယ္။
Incognito windows ကသံုးရင္ history,cookie,cache ေတြ ျပန္ဖ်က္စရာ မလိုေတာ့ပါဘူး။
 Taskmanager က ဖြင့္ထားတဲ့ tabs ရဲ႕ memory,cpu,network သံုးစြဲေနမႈ အေျခအေနကို ၾကည္႕ႏိုင္ၿပီး မလိုအပ္တာကို ပိတ္ထားႏိုင္ပါတယ္။
ွSurf လုပ္ခ်ိန္ဟာ safari,firefox တို႔ေလာက္ကို ျမန္ဆန္ပါတယ္။ Proxy setting ကို IE ကယူေပမယ့္ fonts ကိုေတာ့ firefox လို ေရြးေပး႐ံုပါဘဲ။
Developer tools ကလည္း ျပည္႕စံုေအာင္ အားျဖည္႕ေပးထားလို႔ web developer ေတြ အႀကိဳက္ေတြ႕ေစပါမယ္။
Firefox ရဲ႕ စြမ္းေဆာင္ႏိုင္စြမ္း ကို မယွဥ္သာေပမယ့္ IE 8 beta 2 ထက္ေတာ့ အျပတ္သာပါတယ္။ Google products က အေတာ္မ်ားမ်ား ယူသံုးေနေတာ့ Google chrome ကိုေရာ သင္ ႏွစ္သက္ မွာလား...

Mail ကိုဖြင့္ create application shortcuts နဲ႔ desktop ကို ေရြးေပးလိုက္ရင္ ေနာင္ ေမးလ္ကို web apps တစ္ခုလို ကလစ္ေလးနဲ႔ အလြယ္သံုးႏိုင္သြားပါတယ္။

Incognito windows ကသံုးရင္ history,cookie,cache ေတြ ျပန္ဖ်က္စရာ မလိုေတာ့ပါဘူး။

ွSurf လုပ္ခ်ိန္ဟာ safari,firefox တို႔ေလာက္ကို ျမန္ဆန္ပါတယ္။ Proxy setting ကို IE ကယူေပမယ့္ fonts ကိုေတာ့ firefox လို ေရြးေပး႐ံုပါဘဲ။
Developer tools ကလည္း ျပည္႕စံုေအာင္ အားျဖည္႕ေပးထားလို႔ web developer ေတြ အႀကိဳက္ေတြ႕ေစပါမယ္။
Firefox ရဲ႕ စြမ္းေဆာင္ႏိုင္စြမ္း ကို မယွဥ္သာေပမယ့္ IE 8 beta 2 ထက္ေတာ့ အျပတ္သာပါတယ္။ Google products က အေတာ္မ်ားမ်ား ယူသံုးေနေတာ့ Google chrome ကိုေရာ သင္ ႏွစ္သက္ မွာလား...
July 5, 2008
How to open *.docx, *.xlsx, *.pptx files without Microsoft Office 2007
Post From thinzar00.blogspot.com
MS Office 2007 မွာ file format အသစ္ေတြ ေျပာင္းသြားတာ သတိထားမိမွာေပါ့။
*.docx, *.xlsx, *.pptx file ေတြကို microsoft office 2007 မရွိဘဲနဲ့ ဘယ္လို ဖြင့္မလဲ။ နည္းလမ္း ႏွစ္နည္း ရွိပါတယ္။
First method:
File Format Converter (Compatibility pack for MS office 2007) ကို ဒီမွာ download လုပ္ျပီး install လုပ္ပါ။ file size က 25MB ေလာက္ရွိတယ္။ install လုပ္ျပီးသြားရင္ေတာ့ Word 2007 document (*.docx), Excel 2007 workbook (*.xlsx), Powerpoint 2007 presentation (*.pptx) ေတြကို MS Office 2003 သုံးျပီး အရင္အတိုင္း ဖြင့္လို့ ရသြားပါျပီ။
MS Office 2007 မွာ file format အသစ္ေတြ ေျပာင္းသြားတာ သတိထားမိမွာေပါ့။
*.docx, *.xlsx, *.pptx file ေတြကို microsoft office 2007 မရွိဘဲနဲ့ ဘယ္လို ဖြင့္မလဲ။ နည္းလမ္း ႏွစ္နည္း ရွိပါတယ္။
First method:
File Format Converter (Compatibility pack for MS office 2007) ကို ဒီမွာ download လုပ္ျပီး install လုပ္ပါ။ file size က 25MB ေလာက္ရွိတယ္။ install လုပ္ျပီးသြားရင္ေတာ့ Word 2007 document (*.docx), Excel 2007 workbook (*.xlsx), Powerpoint 2007 presentation (*.pptx) ေတြကို MS Office 2003 သုံးျပီး အရင္အတိုင္း ဖြင့္လို့ ရသြားပါျပီ။
Second method:
အကယ္လို့ ကိုယ္က အင္တာနက္ မရွိတဲ့ ေနရာမွာ ေရာက္ေနမယ္။ အထဲမွာ ပါတဲ့ content ကို အေရးတၾကီး ၾကည့္ခ်င္တယ္ဆိုရင္ ေနာက္တစ္နည္းကို သုံးလို့ရပါတယ္။
Step 1: ဥပမာ file name က mynotes.docx ဆိုရင္ right click > rename လုပ္ျပီး mynotes.zip လို့ေျပာင္းလိုက္ပါ။
Step 2: zip file အေနနဲ့ ျဖစ္သြားျပီဆိုရင္ folder ေပၚမွာ right click လုပ္ျပီး Extract All လုပ္လုိက္ရင္ ေအာက္ကလိုမ်ိဳး file/folder ေတြ ရလာလိမ့္မယ္။
အကယ္လို့ ကိုယ္က အင္တာနက္ မရွိတဲ့ ေနရာမွာ ေရာက္ေနမယ္။ အထဲမွာ ပါတဲ့ content ကို အေရးတၾကီး ၾကည့္ခ်င္တယ္ဆိုရင္ ေနာက္တစ္နည္းကို သုံးလို့ရပါတယ္။
Step 1: ဥပမာ file name က mynotes.docx ဆိုရင္ right click > rename လုပ္ျပီး mynotes.zip လို့ေျပာင္းလိုက္ပါ။
Step 2: zip file အေနနဲ့ ျဖစ္သြားျပီဆိုရင္ folder ေပၚမွာ right click လုပ္ျပီး Extract All လုပ္လုိက္ရင္ ေအာက္ကလိုမ်ိဳး file/folder ေတြ ရလာလိမ့္မယ္။
 Step 3: word ဆိုတဲ့ folder ထဲက document.xml ဆိုတဲ့ file ကို Microsoft Internet Explorer (သို့) Mozilla Firefox နဲ့ဖြင့္လိုက္ရင္ XML code ေတြ ၾကားထဲကေန content ရွာျပီး ဖတ္လို့ ရပါတယ္။ document ထဲမွာ ပုံေတြ ပါမယ္ဆိုရင္ေတာ့ media ဆိုတဲ့ folder ထဲမွာ save လုပ္ထားေပးပါတယ္။
Excel 2007 Workbook (*.xlsx) နဲ့ powerpoint (*.pptx) ေတြကိုလည္း ဒီနည္းအတိုင္း ဖြင့္လို့ ရပါတယ္။
ဒုတိယ နည္းက document ကို original format အတိုင္း ဖတ္လို့ ရမွာ မဟုတ္ေပမယ့္ အေရးတၾကီး လိုအပ္လာရင္ သိထားသင့္တဲ့ နည္းတစ္ခုပါ။ Office 2007 ရဲ့ XML format ေတြကိုပါ ေလ့လာလို့ ရသြားတာေပါ့။
June 10, 2008
DVD ေခြေတြမွာ ျမန္မာ Subtitle ပါလာ
အခုေနာက္ပိုင္း ထြက္လာတဲ့ DVD9 ႏိုင္ငံျခားဇာတ္ကားေခြေတြမွာ ျမန္မာ Subtitle ေတြပါလာပါတယ္။ အမ်ားအားျဖင့္ Diamond တံဆိပ္ေခြေတြမွာ ပါပါတယ္။ DVD Player က Remote နဲ႔ Subtitle ေျပာင္းတဲ့အခါ 1. English လို႔ပါတယ္။ ၿပီးေတာ့ 2 ဆိုၿပီး ပါပါတယ္။ အဲဒါက Myanmar Subtitle ပါပဲ။ အရင္တုန္းကေတာ့ Movie ေပၚမွာ စာတန္းေတြကို အေသထိုးထားပါတယ္။ အခုစနစ္ကေတာ့ ျမန္မာ Subtitle ကိုေရြးမွ Subtitle ဖိုင္ေလးကို ဖတ္ၿပီး ျပေပးတာပါ။ ကၽြန္ေတာ့္အထင္ အဲဒီ Subtile ဖိုင္ေလးမွာ ဘယ္မိနစ္၊ ဘယ္စကၠန္႔မွာ ဘယ္စာတန္းထိုးေပးပါဆိုတဲ့ instruction ေတြပါမယ္ထင္တာပါပဲ။ အဂၤလိပ္ Subtitle လုပ္နည္းကေတာ့ အရင္တုန္းကေတာ့ တစ္ခါစမ္းဖူးပါတယ္။ ေအာင္ျမင္တယ္။ အခု Myanmar Subtitle ေတြ ဘယ္လိုလုပ္ထားသလဲဆိုတာကိုေတာ့ ေလ့လာလိုက္ပါဦးမယ္။ ၿပီးရင္ေတာ့ ဒီ Blog မွာ လုပ္နည္း တင္ထားေပးမယ္ေလ။
April 21, 2008
McAfee SiteAdvisor Plugin for Firefox
Post from cmsmdy.blogspot.com
This plug-in performs a little background check on the Web sites you visit. Get a warning icon next to potentially dangerous results from popular search engines, along with an icon in your status bar that shows the risks and annoyances associated with the page you're viewing.
မိမိ browsing လုပ္ေနတဲ့ site ေတြ ဒါမွမဟုတ္ search engine result ေတြမွာ ျပလာတဲ့ site ေတြရဲ႕ ယံုၾကည္စိတ္ခ်ရမွဳ ရွိမရွိဆိုတာကို McAfee SiteAdvisor Plugin က ကူညီေပးသြားပါလိမ့္မယ္။ အစိမ္းျပေနရင္ေတာ့ အိုေက စိတ္ခ်ရတယ္ဆိုတဲ့သေဘာ၊ အ၀ါျပေနရင္ နည္းနည္း စဥ္းစားသင့္တယ္၊ အနီျပေနရင္ေတာ့ သြားမလုပ္နဲ႔ ကြိသြားမယ္ဆိုတဲ့သေဘာ သက္ေရာက္ပါတယ္။ Site တစ္ခုကို browsing မလုပ္ခင္မွာ siteadvisor.com မွာသြားၿပီး အဲဒီ site ႏွင့္ပက္သက္တဲ့ report ေတြကို ဖတ္ၾကည့္သင့္ပါတယ္။ အသံုးျပဳတဲ့ user ေတြအတြက္ စိတ္ခ်ယံုၾကည္ရမည့္ plugin တစ္ခုျဖစ္ၿပီး Firefox မွာပဲ အသံုးျပဳႏုိင္ပါတယ္။
This plug-in performs a little background check on the Web sites you visit. Get a warning icon next to potentially dangerous results from popular search engines, along with an icon in your status bar that shows the risks and annoyances associated with the page you're viewing.
မိမိ browsing လုပ္ေနတဲ့ site ေတြ ဒါမွမဟုတ္ search engine result ေတြမွာ ျပလာတဲ့ site ေတြရဲ႕ ယံုၾကည္စိတ္ခ်ရမွဳ ရွိမရွိဆိုတာကို McAfee SiteAdvisor Plugin က ကူညီေပးသြားပါလိမ့္မယ္။ အစိမ္းျပေနရင္ေတာ့ အိုေက စိတ္ခ်ရတယ္ဆိုတဲ့သေဘာ၊ အ၀ါျပေနရင္ နည္းနည္း စဥ္းစားသင့္တယ္၊ အနီျပေနရင္ေတာ့ သြားမလုပ္နဲ႔ ကြိသြားမယ္ဆိုတဲ့သေဘာ သက္ေရာက္ပါတယ္။ Site တစ္ခုကို browsing မလုပ္ခင္မွာ siteadvisor.com မွာသြားၿပီး အဲဒီ site ႏွင့္ပက္သက္တဲ့ report ေတြကို ဖတ္ၾကည့္သင့္ပါတယ္။ အသံုးျပဳတဲ့ user ေတြအတြက္ စိတ္ခ်ယံုၾကည္ရမည့္ plugin တစ္ခုျဖစ္ၿပီး Firefox မွာပဲ အသံုးျပဳႏုိင္ပါတယ္။
March 4, 2008
Dictionary Extensions for Firefox
Post From cmsmdy.blogspot.com
internet ကေန ကၽြန္ေတာ္တို႔ ေန႔စဥ္ႏွင့္အမွ် အခ်က္အလက္ေတြကို ရွာေဖြ ဖတ္ရွဴ႕ မွတ္စုလုပ္ေနၾကရပါတယ္။ "သတင္းစာတစ္ရက္ မဖတ္ရင္ တစ္ရက္ေခတ္ေနာက္က်တယ္" ဆိုသလိုပဲ အင္တာနက္ တစ္ရက္မၾကည့္ရင္လည္း အဲဒီထက္ပိုၿပီး ေခတ္ေနာက္က်သြားမယ္ေတာင္ ထင္ပါတယ္။ အခ်က္အလက္ေတြရွာေဖြတဲ့အခါမွာ ကၽြန္ေတာ္တို႔ အဓိကႀကံဳေတ႔ြေနရတာက English စာ အခက္အခဲပါ။ အဓိကကေတာ့ ကိုယ္မသိတဲ့ စာလံုးေပါင္း အဓိပၸယ္ေတြကို နားလည္ဖုိ႔လိုပါတယ္။ အဲဒီလို အခက္အခဲေတြကို အဆင္ေျပဖို႔အတြက္ Dictionary ေတြကို အသုံးခ်ရပါတယ္။ Dictionary သံုးတဲ့အခါမွာ စာအုပ္နဲ႔ၾကည့္တာ ရွိသလို အင္တာနက္သံုးရင္းနဲ႔ Online Dictionary site ေတြမွာ သြားေရာက္ရွာေဖြတာလည္း ရွိပါတယ္။ အခုေျပာမယ့္ firefox extension ေတြကို သံုးမယ္ဆုိရင္ စာလံုးေပါင္းေတြကို အဲလိုမ်ိဳး တကူးတကသြားၿပီး ရွာေဖြစရာ မလိုပါဘူး။ click လုပ္ရံုနဲ႔ ကိုယ္သိခ်င္တဲ့ result ကို ေဖာ္ျပေပးမွာျဖစ္ပါတယ္။
1. Dict - ဒီ extension ကို install လုပ္ၿပီး ရွာေဖြရတာလြယ္ကူပါတယ္။ ကိုယ္သိခ်င္တဲ့စာလံုးကို highlight လုပ္၊ ေနာက္ .. right click လုပ္ၿပီး ၾကည့္႐ံုပါပဲ။ ဥပမာ .. "blog" ဆိုတဲ့စာလံုးကို hightlight လုပ္ၿပီး right click လုပ္ၾကည့္မယ္ဆိုရင္ Define "blog" ဆိုၿပီးေပၚေနတာ ေတြ႔ရမွာပါ။ အေျဖ (result) ကိုေတာ့ pop-up window တစ္ခုအေနနဲ႔ ျပေပးမွာျဖစ္ပါတယ္။
2. Dictionary Search - အေပၚမွာ ေဖာ္ျပခဲ့တဲ့ dict extension နဲ႔အတူတူပါပဲ။ result ကိုေတာ့ new tab တစ္ခုအေနနဲ႔ ေဖာ္ျပေပးၿပီး The Free Dctionary ကို အေျခခံထားပါတယ္။
3. FastDict - ကၽြန္ေတာ္ကေတာ့ ဒီ extension ကိုအႀကိဳက္ဆံုးပါပဲ။ install လုပ္ၿပီးခ်င္း သံုးလို႔မရေသးပဲ သူ႔ရဲ႕ option ကိုသြားၿပီး setting လုပ္ေပးရပါေသးတယ္။ setting လုပ္ဖို႔အတြက္ကေတာ့ Tools > Add on ကိုသြားၿပီး FastDict ရဲ႕ Option မွာ ထည့္ေပးရမွာပါ။ setting ေပးရတာ သံုးမ်ိဳးပဲရွိပါတယ္။ စာလံုးတစ္လံုးရဲ႕ အဓိပၸယ္ကို သိခ်င္ရင္ အဲဒီစာလံုးကို control+click (or) shift+click (or) alter+click နဲ႔ၾကည့္မွာလား ဒါမွမဟုတ္ သံုးမ်ိဳးလံုးကို အသံုးျပဳၿပီး ေရြးမွာလားဆုိၿပီး setting သတ္မွတ္ႏုိင္ပါတယ္။
 Option ထဲမွာပါတဲ့ setting ေတြပါ။ ကၽြန္ေတာ့္ဆီမွာ control+click လုပ္ရင္ စာလံုးရဲ႕ အဓိပၸာယ္ကို ေဖာ္ျပဖို႔ လုပ္ထားၿပီး Dictionary ကိုေတာ့ Cambridge Dictionary ကို ေရြးထားပါတယ္။ Dictionary ေတြအျပင္ wiki, google search စတာေတြမွာလည္း ရွာေဖြဘို႔အတြက္ setting ေပးထားႏုိင္ပါတယ္။
May 23, 2007
Comparing IE And Firefox


Subscribe to:
Posts (Atom)